Overview
Enable your company's eCat users to easily configure products by selecting product options like color, size, fabric, molding style, bulb type, trim, etc. Eliminate product configuration errors by restricting which options can be selected for a given product and requiring users to select all necessary options. Eliminate complex price lists, time consuming calculations, and pricing errors by automatically displaying prices based on which options are selected.
eCat Option views
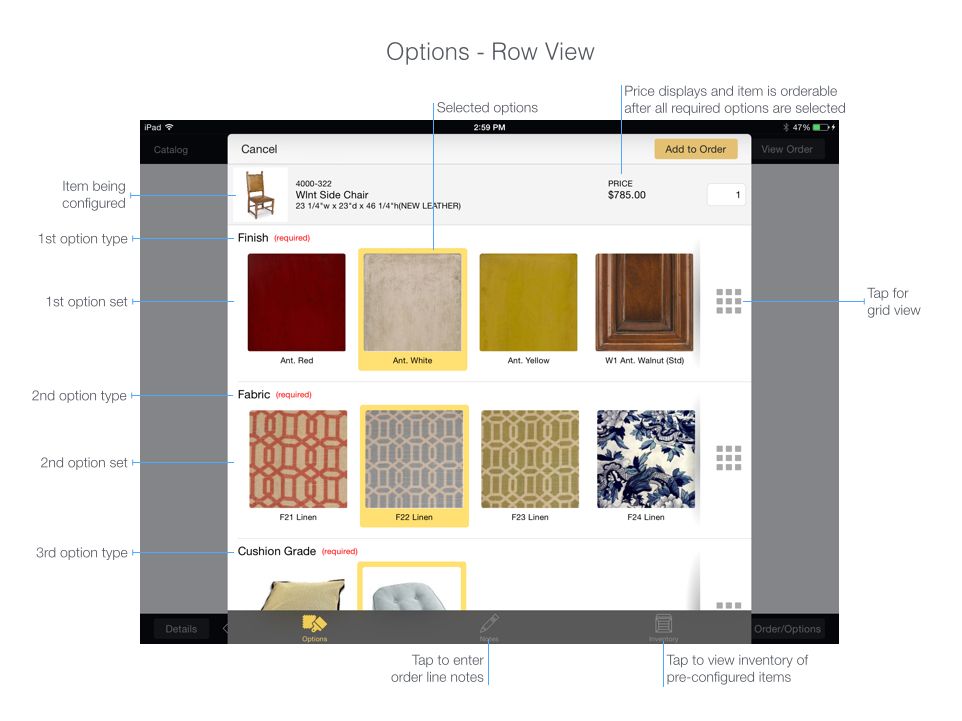
eCat users tap option photos in eCat's option selection panel to select options of different types and configure products. They can view options in rows and scroll horizontally to see what selected options of different types look like together.
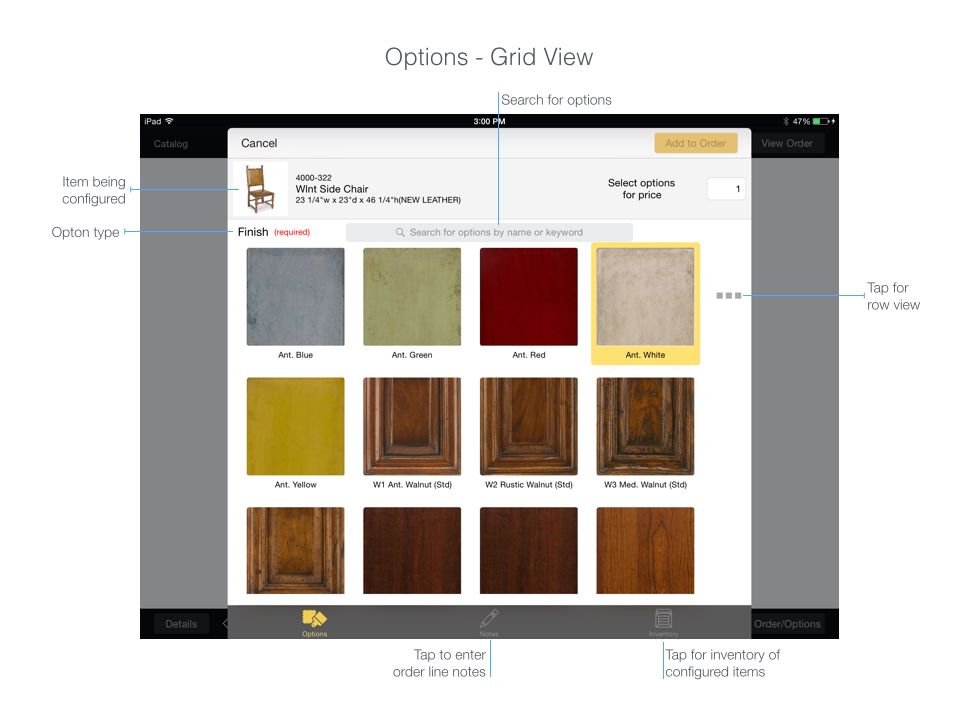
Or they can choose the grid view to search or rapidly scroll through a large number of options of a single type.
Options terminology
'Option Type'
Option type is the label for a set of options, like "Color”, "Fabric", "Style", "Top Size", etc.
- Up to 8 different option types can be defined in eCat by default. This can be increased to 20 types if necessary.
- Each option type is associated with a single option set in the product file.
- Option types/sets are numbered 1-20. This determines display sequence on the iPad.
'Option Set'
Option sets (short for 'option selection set') define which options of a particular type may be chosen for a given product. Option sets are defined in product file fields and contain one or more option groups for any item to which they apply.
- Users may select a single option from each option set associated with a product.
- An option set can contain options that affect product price differently when selected.
- Option sets may or may not be defined as 'required'. A user must select an option from each 'required' option set before an item can be ordered.
- Selection of an option from a given option set may be required for some products, and not for others.
- Option sets are displayed in eCat with OptionSet1 first (top row), OptionSet2 next, etc.
'Option Group'
An option group is a collection of related options that can be applied to a product.
- Each option group is associated with a unique code. Option group codes are used to associate groups with one or more option sets.
- Options in an option group must be of the same option type.
- Options in an option group must have the same price impact on products when selected.
- A multiplier or a fixed upcharge monetary amount can be associated with an option group to change the product price when an option from the group is selected. The price of a product when options are selected from a specific option group can also be looked up in a price matrix file.
'Option'
An Option is a specific feature/attribute like 'Red', 'Large', or '36" Top' that can be selected as an attribute of a product.
- Each option is associated with a unique code. Option codes are used to associate options with an image, one or more option groups, a name, and (optionally) an up-charge to apply when the option is chosen for an ordered product.
- A price factor or a fixed up-charge monetary amount can be associated with an option. Note! If an option with a price factor or fixed upcharge amount is assigned to an option group that also has a price factor or fixed upcharge amount, the option group 'wins'. The option will be priced based on the option group price parameter, not the option price parameter.
- An image can be uploaded for each option.
Option setup example
This illustration shows how options could be set up for a chair that requires selection of a wood finish and an upholstery fabric before it can be ordered. The price of the chair is determined by which finish and fabric are selected.
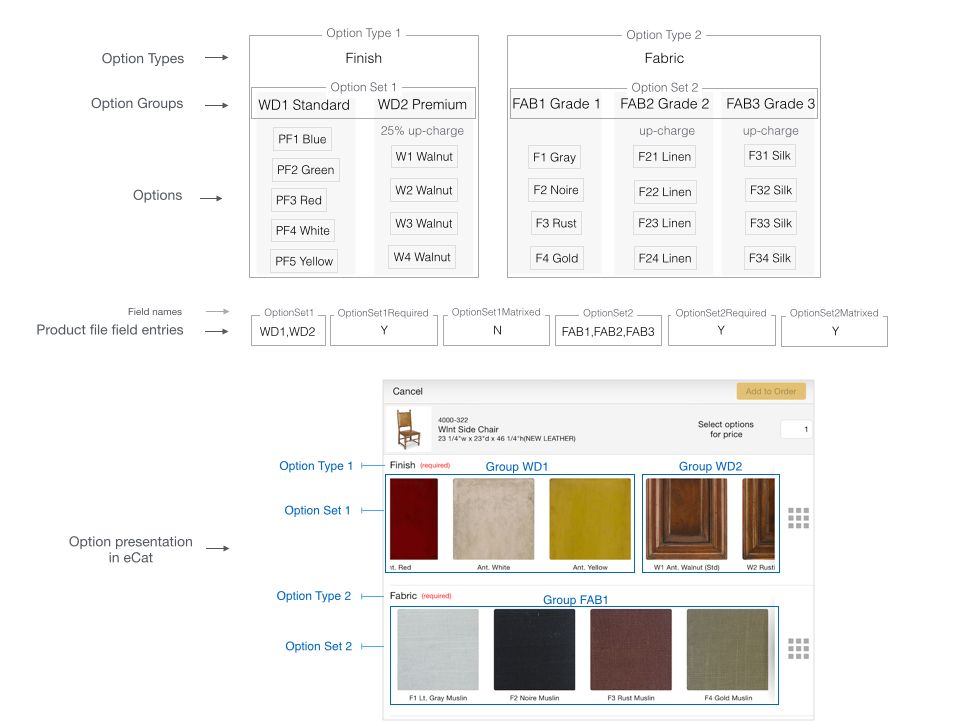
The first option type 'Finish' is associated with an option set containing two option groups, 'Standard' and 'Premium'. The option group 'Standard' contains the options [ "Antique Blue", “Antique Red”, “Antique White”, “Antique Yellow” ]. These do not affect product price when selected. A second option group "Premium" contains the options [ “Antique Walnut”, “Rustic Walnut”, “Light Walnut”,"Pickled Walnut" etc.]. The product price increases by 25% of the base price at the selected price level when these options are selected. A finish must be specified when the chair is ordered, so the option set is 'required'. The product price with options from the option set is calculated as an up-charge, so the option set does not require price matrix lookup.
A second option type 'Fabric' is associated with an option set containing three option groups, 'Grade 1', 'Grade 2', and 'Grade 3'. The fabric options in each option group are the same price. The fabric options in the 'Grade 2' group are more expensive than the fabric options in the 'Grade 1' group. The fabric options in the 'Grade 3' group are more expensive than the fabric options in the 'Grade 2' group. The groups are ordered in the set so the list will scroll from the least to the most expensive fabrics. A fabric must be specified when the example product is ordered, so the option set is required. The product price with a fabric from a specific group depends on how much fabric is required to cover the item. So this option set is configured for price lookup in the option price matrix.
Configuring options
The steps for setting up options are:
- Define option types
- Define options
- Upload option images
- Define option groups
- Populate product file option sets
- Set up matrix pricing (if required)
1) Define option types
- Determine the option types required for your products.
- Assign numbers to option types in the sequence in which they should display in eCat. It's usually best to list option types from which a selection is required and the most frequently used option types first.
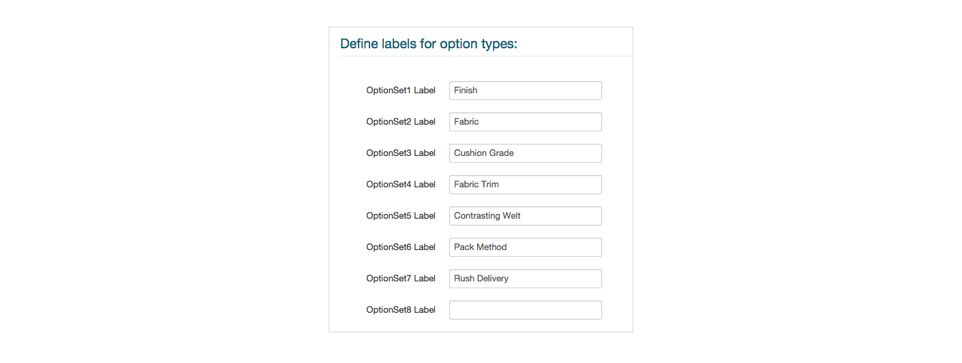
- Enter the option type names in the admin portal page Tools>Company Settings>Option Types.
2) Define options
Options and option groups can be set up either by using the eCat admin portal Products>Options page to define them manually, or by using special files to import them. One of the two methods must be chosen and used exclusively. They cannot be used concurrently.
If there are not many options and option groups, it may be easier and more flexible to create and administer options in the portal. Using this method, the portal can be used to adjust option information at any time. Options defined using the portal are sorted 'ASCIIbetically' by option code. The display sequence cannot be otherwise controlled.
If there are many options and option groups, it may be easier to maintain options by importing them as a batch in a file. The file must be re-imported any time options are changed. An explicit display sequence can be specified for options imported using a file.
To define product options in eCat...
- List the options of all types necessary to describe your company's products.
- Assign a unique code to each option.
- Identify options that affect product price and how they affect the price.
- Define the options in the admin portal or import them using a file.
Using the admin portal to define options
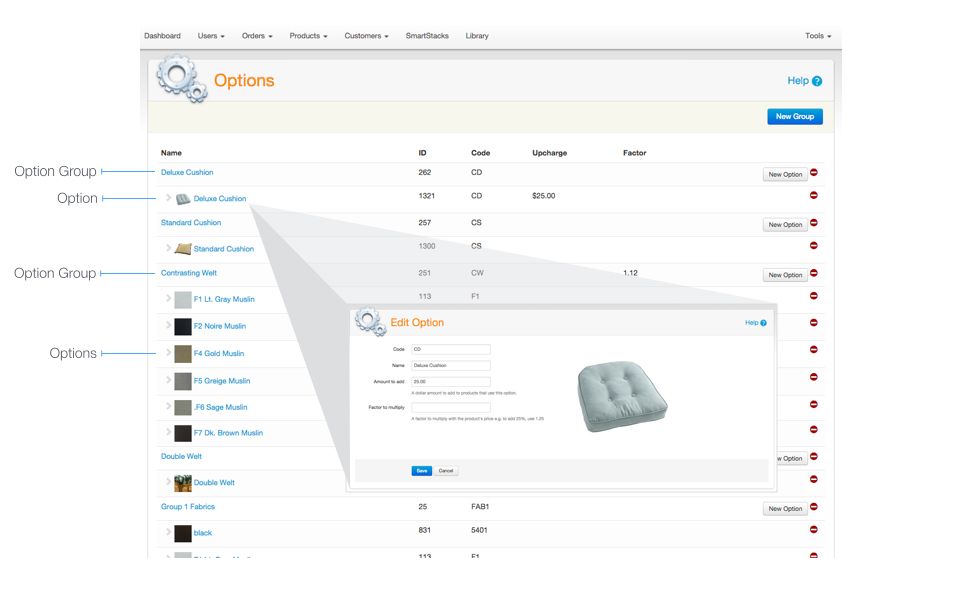
- View the admin portal Products>Options options maintenance page.
- If no groups exist, click the 'New Group' button and create an option group.
- Click the 'New Option' button under the group and fill in the blanks to create the option.
Importing options in a file
The admin portal Tools>Import Data>Options tool can be used to interactively import a file with options information. (If you do not see this option on your menu, contact SuperCat support to have it turned on.)
The options file can also be imported by putting it in the '/data' directory of your eCat FTP site. When importing via FTP, the file should be named 'options.csv'.
The options file may have the following fields. Only code and name are required.
- Field Name Req? Length Comments
- Code
Y 8 Unique code for this option - Name Y 25 Displays under option image
- SortValue N 10 This is used as a primary sort key for options values sent to the iPad. The option code will be used as a secondary sort key. Both values are sorted as strings, ASCIIbetically.
- Description N 50 This text does not display on the iPad, but will be used for option searching.
- ImageName N 50 An explicit image name for the option. If not present, the default name '<Code>.jpg' will be used.
- PriceAddend N 8 Fixed amount to add to item price when this option is selected*
- PriceFactor N 8 Factor by which to multiply item price at selected price level when this option is selected (Ex. a price factor of ‘1.25’ will add an amount equal to 25% of the item price at the selected price level to the item’s price.)*
*Note! If an option with a price factor or fixed upcharge amount is assigned to an option group that also has a price factor or fixed upcharge amount, the option group 'wins'. The option will be priced based on the option group price parameter, not the option price parameter.
Controlling Option Display Sequence
Uploading options in a file provides more ways to control the order in which options display in eCat.
By default, options are shown by option group, then sorted by option description in asciibetical order. If for example
- options with the descriptions 1,2,3, and 4 are sequenced in the options.csv file in the sequence 4,3,2,1
- options 1 & 3 are in Group 1
- options 2 & 4 are in Group 2
- the product file option set contains ‘Group1,Group2’
then eCat will show the options in the sequence 1, 3, 2, 4.
To explicitly control the order in which options are displayed irregardless of their placement in the options file or option group membership, add a field named 'SortValue' to the options file and populate it with values by which you want to sort the options. eCat will display the options in asciibetical order based on the values in the file.
3) Upload option images
Option photos display in eCat's option picker as a visual reference. Users tap option photos to associate options with products.
- Option image files should be in JPEG format.
- Option image display size in eCat is 300px x 300px. Larger images will be resized during import.
- The option image file name must consist of the option code followed by the '.jpg' file extension unless otherwise specified in an options import file.
- Option images look best in eCat if there is no white space around the image.
Upload option images by putting them in your eCat FTP site 'option_images' directory. It may take up to 30 minutes for the images to be processed and available for sync to iPads.
Individual option images can also be uploaded one at a time using the admin portal option image upload tool Tools>Import Images>Option Photo.
4) Define Option Groups
Associate Options with Options Groups to create sets of mutually exclusive Options from which users will choose when ordering products. Each group is assigned a unique code, a name, and a price, if applicable. Then a specific selection of options is associated with the group.
Note the following important points.
- An option can be assigned to more than one group.
- If an option has an upcharge, and it is in an option group that also has an upcharge, the option group's upcharge will be applied and the option's upcharge will be ignored.
To define option groups in eCat...
- Identify the options necessary to configure each of your company's products.
- Divide the options into groups by type and by price.
- Assign a unique code to each option group.
- Define the option groups in the admin portal or import them using a file.
Defining option groups in the admin portal
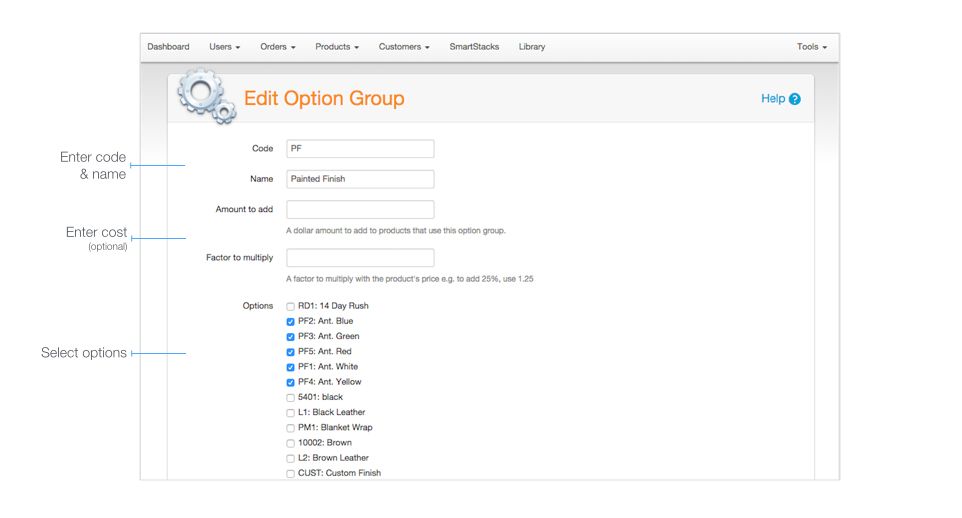
- View the admin portal Products>Options options maintenance page.
- If no groups exist, click the 'New Group' button and create an option group.
- Click the 'New Option' button under the group and fill in the blanks to create the option group.
- Check the boxes next to the listed options to associate options with the group.
Importing option groups in a file
The admin portal Tools>Import Data>Option Groups tool can be used to interactively import a file with option group information. (If you do not see this option on your menu, contact SuperCat support to have it turned on.)
The option groups file can also be imported by putting it in the '/data' directory of your eCat FTP site. When importing via FTP, the file should be named 'option_groups.csv'.
The options file should contain have the following fields. Only code, Name, and Options are required.
- Field Name Req? Length Comments
- Code
Y 8 Unique code for this option group - Name Y 25
- Options Y n/a Comma-delimited list of option codes that belong in this option group, listed in desired presentation sequence (no length limit)
- PriceAddend N 8 Amount to add to item price when an option from this option group is selected
- PriceFactor N 8 Factor by which to multiply item price at selected price level when an option from this option group is selected (Ex. a price factor of ‘1.25’ will add an amount equal to 25% of the item price at the selected price level to the item’s price.)
5) Populate product file option sets
Option set fields on the product file define which options of each type may be chosen for a product. One or more option groups may be specified in the option set for each option type.
- Add option set fields to the product file for each option type defined in step 1.
- Populate the option set fields with the appropriate option group code(s).
Product file option set fields
- Field Name Length Comments
- OptionSet# 8 (Replace the '#' in the field name with the option set number.) This field must contain at least one valid option group code. Multiple codes should be separated with commas (no spaces). The order in which option groups are entered controls the sequence options display in eCat.
- OptionSet#Required 1 (Replace the '#' in the field name with the option set number.) Enter 'Y' in this field if the user must select an option from this set when configuring this product. Enter 'N' if option selection is not required.
- OptionSet#Matrixed 1 (Replace the '#' in the field name with the option set number.) Enter 'Y' in this field if the price of the item should be looked up in the price matrix file when an option from this set is selected. Enter 'N' if matrix pricing is not used for this option set.
6) Set up matrix pricing
Click here for summary information on option matrix pricing.
Please contact SuperCat's support desk if you need further information about matrix pricing.
Further Notes
Using the Same Option in Multiple Groups
The flexibility of the option system also leads to some complexity that is worth being aware of. It is possible to assign the same option to multiple groups. In fact, we encourage this because it allows you much more flexibility when it comes to setting up different types of products.
However, it is probably wise to make sure that a single option doesn't repeat for any given product. For example, if you have a fabric FAB1 that belongs to groups CUSHION_A1 and CUSHION_A2, and you assign both of those groups to a single product option set, e.g. OptionSet1 in the product file, this could lead to complexity with pricing.
In this case, if you pick option FAB1, it will correspond to whichever option group shows up first in the product file for that particular option set.